Sunday, January 27, 2013

Gift Giving Made So Easy...

I am in love with the new Muslin Bags in the CTMH Spring 2013 Idea Book. They are extremely easy to decorate. Just stamp and fill! Our My Acrylix Stamp Sets and our Exclusive Inks work really well on these cute little bags.


The first one I made was "A Pocket Full Of Sunshine".  I filled it with little packet of Lemonade as that always reminds me of sunshine... but I also pictured sunscreen for someone going on a trip, plane tickets to somewhere warm, or even a summer scented candle.


I love my coffee, so I had to make one with a coffee theme.  I love the little sentiment on this one and you can see in the close up below how clear the image comes out on these bags.  I chose to put a Cafe Au Lait candle that I had handy, but I also thought a Tim Horton's, Dunkin Donuts or Starbucks Gift Card or even a little packet of ground coffee or K Cups would work well.


The last one I used is from the February Stamp Of The Month, Home Sweet Home.  I thought you could fill this with a candle, perhaps a Home Improvement Gift Card, but the possibilites are endless.  I can even see a Real Estate Agent using these as a cute way to present a new homeowner with their new keys, using the sentiment, Home Sweet Home!!!


These are very affordable and literally take less than 5 minutes to make!

Pillow Box Treat Holders

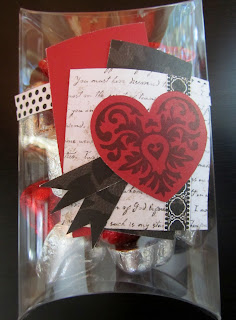
I was inspired to try these little cuties when I saw them featured as the For Always Workshop On The Go Bonus Project.  I always tend to shy away from these things, but always wonder why I even procrastinate when I realize how easy they really are.  I followed the pattern for the Valentine/Love theme, but honestly I can't wait to make some of these in all occasion themes... They are very inexpensive ($2.95 for 3) and they are relatively large in size so you can fit a lot in them.   They are also very sturdy!


The possibilites are endless with these cute little boxes.   I can picture so many cute ideas:
  • Candy
  • Gift cards
  • Party favors (goldfish for a childs pool party, makeup for a princess party, lego pieces for a lego party, etc)...
I love the price and I love how easy they are to assemble and fill!

Friends, free product & fun... what are you waiting for???

Do you have a group of friends you love making memories with?  Why not spend an evening learning how to celebrate your memories.  It's a lot of fun to get together, create a free project and see the individual touches people put on their projects.  The best part is, I do all the work, you just invite your friends.  I show everyone the awesome CTMH products, we create a 1 page layout or a beautiful greeting card (see example below) and you reap the benefits when people order by earning free product and additional items at a discount depending on your total gathering sales. 


My sister had a gathering Friday night and once the final sales for her gathering are in, she will earn the following:
  • $100-$120 in Free Product
  • 2-3 items in the Idea Book at 50% off
  • A monogram stamp with her initial (just for hosting the party)
  • The February Stamp Of The Month (just for hosting the party)
Email me at killiandeb@gmail.com if you are interested in hosting your own Home Gathering and earning free product while having a fun night with your friends.  If you don't have room, let me know, I may be able to host your party at my house.

A star is born...

 I have been procrastinating the decorating of the My Creations Star because it looked so intimidating.  Boy was I wrong.  One of the reasons I love selling CTMH is all the support they offer their consultants.  When people started questioning how to make this star, Corporate posted a printable template which made this project extremely easy.  I brought this to show at my sister's home gathering, not realizing it matches her decor and I had to wrestle it from her at the end of the party!  I have already ordered more and plan to do them in different patterns... and I may just give her this one after all!

 I started by sponging all the edges of the 3D star base with Chocolate ink.  I cut the pieces as per the template and sponged the edges of the paper too.  I made a small green flower for the center using one of the strips of leftover green paper from the same paper pack.  It was made using a border punch, but could have just as easily been made using the Cricut and one of our awesome cartridges.  I finished it off with one of the Pewter Filigree Charms (Z1269) - shown below.


I wanted to show this beautiful star in another pattern.  It is actually the bonus project featured in the Chantilly Workshop On The Go.  I did not make the Chantilly one yet, but have a feeling I just might.


I plan to do a My Creations Star Workshop sometime in March.  The cost will be $20 and will include the star, precut materials and coordinating embellishments.  Please email me at killiandeb@gmail.com if you are interested in the details once they are available.

A look at Chantilly...


I had a chance to break into my product from the new CTMH 2013 Spring Idea Book.  I was immediately drawn to the Chantilly paper packet since it is so pretty and versatile.  It reminds me of Spring, and since it's been pretty cold in Upstate New York lately, I decided to go with it.  It's very easy to picture this paper pack for Spring, Summer, Easter, Birthdays or just all occasion, so I chose to do a variety of cards for different occasions.  

These particular cards are made from the leftover paper in one of my upcoming precut scrapbooking kits.  It will feature 3 completely different layouts and the five cards shown above.  I am waiting on the last items to arrive to complete the layouts, but I thought I'd offer a sneak peek of this fabulous paper pack, which is available for purchase on Feburary 1, 2013.

All cards were made using the card patterns in the Make It From Your Heart How To pattern book.  I love this book.  I have made every pattern in it and I continue to use it over and over... best $7.95 I have spent in a long time.

I also decided to purchase the CTMH Watercolor Pencils, so I did a lot of coloring on these cards, which is something I don't typically do, but am glad I did. I have to admit, it was very relaxing. The kid in me has always enjoyed coloring, so it was a fun twist to my typical stamp and go method.


The first card (shown above) is pattern #27.  The Easter theme came to me when I used the new Easter Wishes stamp set (B1422, Pg 65 Spring Idea Book)and once I started coloring the eggs, I decided they would fit well on this card front.  I added a little Easter Wishes sentiment from the same stamp set.  I finished it off with Liquid Glass to pop the dots and lines on the eggs and used some of the new Glimmer Gems to complete the card.  The eggs were stamped with Cotton Candy and all pieces were sponged with Ruby ink.  The coordinating cardstock is Cotton Candy.


The second card (shown above) is pattern #25.  This is just a generic "hello" card.  I love the "A Tree" stamp set (A1124, pg 70), but I was avoiding it because it needed color... since I finally got the Watercolor Pencils, I decided to go for it and I am happy I did.  I love how it came out.  I finished it off with Liquid Glass to pop some of the dots in the tree, the trunk of the tree and the middle of the butterfly.  Pieces were sponged with Twilight ink and the sentiment was also stamped in Twilight and coordinating cardstock is Buttercup.


The third card (shown above) is pattern #22.  This is a beautiful Thank You card made using the "A Flowering Bunch", which is actually the June Stamp Of The Month and can be found on page 143.  It can be yours for $5 with a $50 order or you can purchase it outright for $17.95.  I just love the flowers in this stamp set, and they are just beautiful when colored with the Watercolor Pencils.  Sentiments and pieces were sponged with Cotton Candy ink and carstock used is Buttercup.


The fourth card (shown above) is pattern #23.  I absolutely love how the Chantilly pattern papers show on this card.  I used a retired Birthday stamp set, but honestly any Birthday stamp set would work.  I love how it came out.  I finished it off with the new pink glitter gems (Z1807) and a little flower I made out of a scrap of paper and some folds.  Coordinating cardstock is Cotton Candy, Buttercup and Pear.  Pieces were sponged in Pear ink.

The last card (shown above) is pattern #28. This is just another Birthday Card. I used the little Cupcake and flower stamp from the Claire Workshop On The Go Stamp Set and then an older stamp I had (Smile It's Your Birthday).  The cupcake needed color... so I continued my theme of  coloring with Watercolor Pencils.  I finished it off with Liquid Glass to pop the middle of the flowers and the icing on the cupcake.  Pieces were sponged with Pear ink.  The pretty blue and green trim is the zip strip from the B&T paper. 

As I mentioned above, these cards were made as part of a kit I will be offering.  I may also offer these cards as part of a Spring Card Workshop.  If you are interested in receiving details about this kit or information about a Card Workshop, please email me at killiandeb@gmail.com so I can email you when the information is available.


For Always Bracket Frame

 When I saw this Bracket Frame in the Spring 2013 Idea Book, I feel in love with it immediately.  The sample in the book clearly looks made for a wedding photo, however I decided to showcase it as a home decor item anyone can use.  I decided to use the February Stamp of The Month, which I also love.  The theme of the February Stamp Of The Month is Home Sweet Home, so it was perfect!

The photo above (shown on page 30 of the Spring Idea Book) is what inspired my bracket frame below.

I decided to keep the outside of the frame simple since I wanted to decorate the inside sentiment a little more.  I love the how they used the Honey and Lagoon Cardstock in the sample, so I used the same colors.  I am also tempted to do one in Lagoon and Smokey Plum (as shown in the Card Workshop on page 37 of the Spring Idea Book).  I used the leftover resin flower and pin from the For Always Assortment (Z1811) after I completed the Workshop On The Go layouts and Pillow Box Bonus Project.  I also added a few resin flowers I had left over from the Bouquet Assortment (Z1694). 
 
 This frame was extremely easy to assemble since I used strips of paper instead of one solid piece.  I just had to trim each piece with a craft knife.  It also allowed me to use leftover paper, which is always great.  I used a border punch (not CTMH) to achieve the scallop floral Honey colored edge around the inside of the frame and for the Lagoon colored trim on either side of the sentiment.  I used the Silver Shimmer Trim (Z1799) cut in small strips to separate the papers on the frame and also on the Lagoon trim inside the frame.  I finished it off with some Sparkles-Black and Grey Assortment (Z1754). 

I am going to do a Bracket Frame Workshop on Saturday, February 16, 2013.  Cost will be $20 and will include the frame, precut papers, embellishments, stamps and ink to complete a frame similar to this one.  Email me at killiandeb@gmail.com if you are interested.


Tuesday, January 1, 2013

Out with the old... in with the new...

... and I am not talking about the New Year!!!  I am thrilled to have the new Spring 2013 CTMH Idea Book in my hot little hands and can't wait to share it with you!


I am busy planning my workshops and am hoping to add some all day/weekend crops this year.  As soon as I have the details figured out, I will share them with you!

Email me to get a copy of the new Spring 2013 Idea Book!!  You can't order until February 1, but that just means you can take your time and browse through and figure out your favorites!!

If you see product you love, and want to know how to get it for free, contact me so we can discuss options for a Home Gathering.  I do all the work, you reap the rewards!

HAPPY NEW YEAR!
May it be happy and healthy!