I had such a great time at my Open House last Saturday. In my short time as a CTMH Consultant, I have had the opportunity to connect with so many wonderful people, some I knew from before and others who I consider myself lucky to meet along the way!! I can't even express my gratitude for the support they have shown me since I joined CTMH in February and I look forward to meeting even more wonderful people along the way! I really enjoyed making some new projects to showcase the Fall/Winter Idea Book and gather for a few hours to chat and share ideas. Here are some of the items I created to show! I took the time to include links to most of the items in the event you love them as much as I do!!
The photo above features cards made from the new Clementine Pattern. I chose to make the cards that were featured as the bonus project in the
Clementine Workshop On The Go (pg 29). As noted in the book, in order to make these cards, you will also need the
Burlap Ribbon and the
Sparkles Brown and Tan Assortment. These cards were quick, easy and fun to make and are absolutely adorable.


Another one of my favorites from the Fall/Winter IB is the
Dakota Pattern (not only do I love the colors, but my daughter's name just happens to be Dakota, so what's not to love). I realized quickly that although I loved the paper pattern and the colors, it kind of screamed country and I didn't really have any photos that would fit that theme. I started looking through the photos I have ready to scrap and realized my photos from our family Disney trip would be perfect. I immediately noticed the red and blue colors of the Planet Hollywood and Epcot photos, so that is what I settled on.

The inspiration for the above layout actually came from page 13 of the Idea Book that showcases the awesome
Studio J product, specifically the "Little Miss" collection. I just sort of winged it and I love how it turned out. I featured the
Barn Red Cardstock on this layout as it made a good base for the white diamonds bases for each pattern piece. I used
Pacifica Cardstock for the blue color. Since I found the B&T paper with the large circles overpowering as a full sheet, I decided to cut the circles out and use them to embellish the pages. I even cut the smaller flowers and used them as flowers and small leaves. I absolutely love how it adds the perfect pop of color and design! I finished it all up with the Pearl Badge Buttons (found in the
Wrangler Collection), some
Bitty Opaques Pearls, some
Black Baker's Twine, a button from the Black
Mini-Medley Collection and I used the My Acrylix "Follow Your Dreams" D1495 Stamp Set (Retired) for the words and the stitching around the edge.

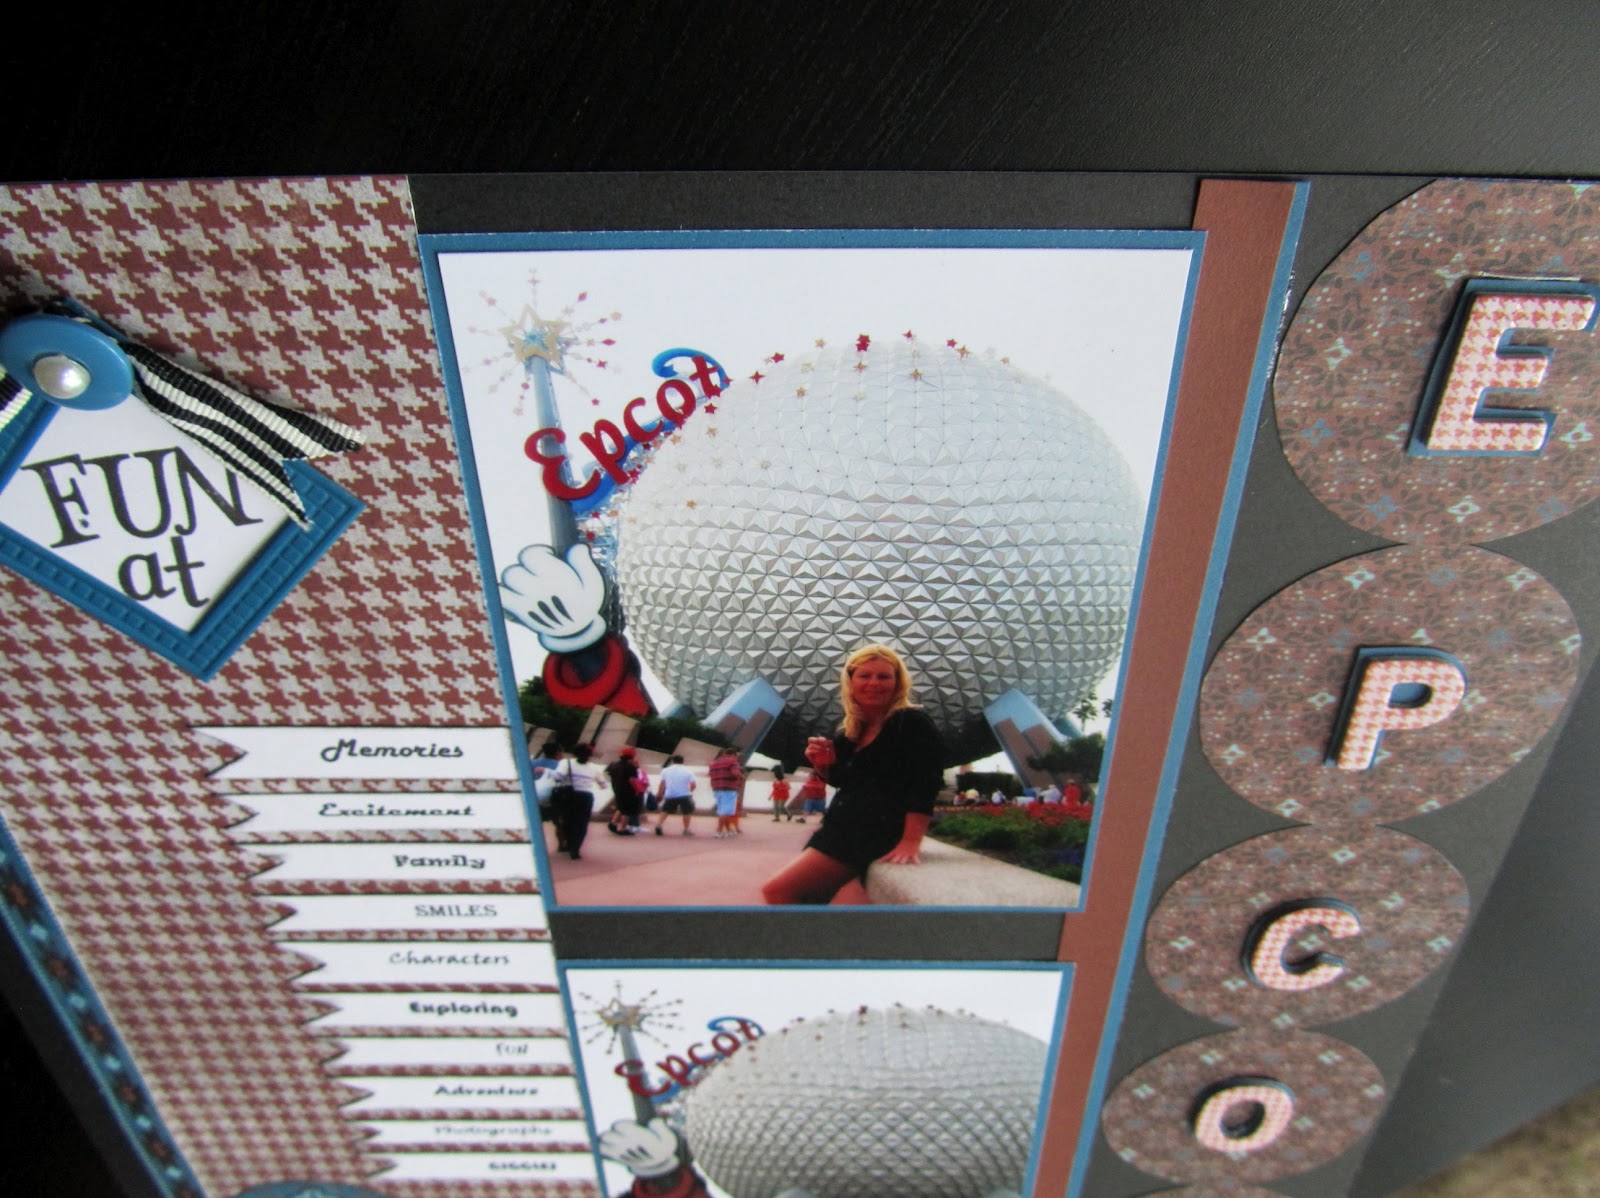
Once I realized that I was in love with the idea of cutting the circles from the B&T Dakota paper, I was hooked. It didn't take long for me to realize that the word EPCOT would fit nicely down the page and that
Black Striped Grossgrain Ribbon would look nice threaded through the circle centers. I used
Black Cardstock as the base on this next layout since my last photo was at night and I wanted to tie that in. I love the new
Irresistibles Houndstooth Alphabet and I used
Cranberry Exclusive Ink since I did not have Barn Red. For the circle base for the letters, I simply used the other side of the larger circle pattern paper and it features the pretty smaller floral pattern. I accented using items from the Pacifica Mini-Medley (retired) and the same pearl buttons and opaques used in the layout above. I really had fun creating these pages!!


Speaking of fun!!! How adorable is the
"It's Your Day" My Acrylic Double Stamp set that is being featured for National Stamping Month?? Only $5 with a $35 purchase. Don't wait too long, as it's only available until September 30th and the possibilities are endless with this stamp set! So much FUN!!!
I had no problem deciding what photos to use for this layout. Our day at The Great Escape was filled with fun adventures and this stamp set made it easy to add a variety of captions/sentiments that went very well with the photos. Because of the colors in the photos, I was immediately drawn to the
Stella Pattern... and I am very pleased with how this layout turned out!


Next up is the
Flirty Pattern. I have to admit it was not one of my immediate favorites, but as soon as I found this school photo of my daughter and realized the color of her shirt matched perfectly, I just kind of went with it. I used the cover of the
Spring/Summer Idea Book for my layout inspiration as I have always loved that one page layout. I wanted a background that would pop some of the green in the paper so I used Garden Green (retired). The half circle was cut out of the
Stella paper (I already had it laying around). I accented around the frame using
Goldrush Exclusive Inks and the
My Acrylix Eclectic Edges Stamp Set as I just wanted to tie a little more of the orange from the pattern into the base. I made the large flower using the technique shown on page 49 of the Fall/Winter Idea Book (in the Flirty section). The hearts were easy to cut out using the
Cricut Art Philosophy Collection (also used the Cricut to cut the letters for LOVE out of
Autumn Terracotta Cardstock). I used the scrap that the heart was cut from for the banner at the top of the page. I just added a small
Dimensional Elements Hearts and some
Autumn Terracota Baker's Twine and finished with a few
Sparkles from the Clear Assortment Collection... and instant accent! Other items used were a larger Dimensional Elements Heart from the same collection as the smaller one previously mentioned, Sparkle Buttons from the
Boutique Collection,
Silver Shimmer Trim and the "who you are" came from the My Acrylix
Fashionista Stamp Set (one of my favorites).

I could not have a reveal party without showcasing my favorite holiday pattern yet,
Pear and Partridge. It is so pretty and since I love pink, I was happy that it coordinates so well with the
Smoothie Cardstock (since I seem to have stocked up on that... most likely because of my love for pink). My inspiration for this layout came from the new
Make It From Your Heart how to pattern book. I absolutely love Volume 1 and can't wait until Volume 2 comes out! The other reason I love this paper so much is that it coordinates well with Olive, Cranberry, Chocolate or Cocoa. I chose
Cocoa Cardstock as the base (frame) for this layout and then used
Colonial White for the actual layout. I accented with
Olive Cardstock and
Cranberry Cardstock, which picks up all the wonderful colors of this paper.

I used the
Irresistibles Houndstooth Alphabet for the word Christmas. Directly above the word Christmas, I stamped "A Very Merry" from the October Stamp Of The Month - Very Merry (page 141 of the Fall/Winter IB). The poinsettias were made using the
Art Philosophy Collection and are actually snowflakes (as seen on page 88). I did not have the
My Acrylix Snowflakes Stamp Set when I made this layout, so I just added other stamps and glitter glue to create the look of the flower. I have since ordered the Snowflakes Stamp Set (it's on it's way as I type). I also used the Cricut Art Philosophy Collection to cut the Olive scrolls and the squares (then I used the
corner rounder). Just like the above Dakota layout,
I used the My Acrylix "Follow Your Dreams" D1495 Stamp Set (Retired) for the stitching around the edge. The leaves are from the Just Blooms Floret Paper Shapes.


I couldn't do Christmas layouts and not try the Christmas cards... so I followed the pattern on the
Pear and Partridge Cardmaking Workshop On The Go. Since I didn't have the actual workshop, I used the October Stamp of the Month - Very Merry Christmas and another retired Holiday Stamp Set I already owned. Just as with the above layout... I used Cocoa, Olive and Cranberry inks and cardstock.

Last, but certainly not least is the
Display Tray Home Decor Project! I have to admit that I loved this from the moment I saw it. I decided to wait as I had already spent a lot on product needed to make samples. The day before my Open House, I was in Hobby Lobby for adhesive (I didn't plan well and ran out) and happened to see this sitting all alone on an end cap. It was either $14.95 or $19.95, I don't even remember as I was so excited I had it in my hands and could at least demonstrate what it would look like finished. Now I am guessing the quality of the CTMH one is a little better and I have to say, the columns were not exact on this and the paper was different for each section, but the end result is beautiful. I will definitely be ordering more of these as they make the perfect gift.
I used the Avonlea pattern with this project and I actually had some sentiments stickers (non-CTMH) that had coordinating colors and the perfect quotes, so I used them. For embellishments, I used the following CTMH products:
Dimensional Elements Mixed Shapes,
Dimensional Elements Hearts,
Bohemian Assortment,
Color Ready Garden Wooden Shapes,
Burlap Ribbon, Avonlea Canvas Compliments (x7155C-not showing on website right now),
Parlor Velvet Rub Ons,
Brown and Tan Sparkles,
Dark Chocolate Grosgrain Ribbon,
Chocolate Baker's Twine, and various other items I had handy.

The large heart and the Garden Wooden Shapes were stamped with the new
Whimsy Exclusive Inks Mini Pigment Pads (I used Twilight, Juniper and Sweat Leaf). I used
clear embossing powder and heated with a
craft heater. I love the look as the slight shine matches the quoted stickers I had in my stock. The My Acrylix Stamps Sets that were used on this project are: It's Your Day (see double stamp set - Great Escape layout above) and
The Best Things, one of my go to stamp sets.
Well that about sums up my sample projects from my Open House Reveal Party last week. I can't wait to get my next shipment of new products to try... especially the Cricut Artiste Collection... hurry up Fedex... the suspense is killing me!